
Browse Guides
5 guides
3 guides
2 guides
13 guides
1 guide
9 guides
12 guides
2 guides
18 guides
1 guide
1 guide
1 guide
2 guides
1 guide
1 guide
1 guide
1 guide
1 guide
1 guide
1 guide
2 guides
2 guides
1 guide
Image Review
Review pallet QA validation images, inspect device results, mark issues, and move useful images into dataset work.
Use Image Review when you want to review one pallet QA validation session image by image, compare the device inspection with the actual snapshot, and save feedback for follow-up model improvement work.
This page is especially useful when a team needs to confirm whether the device missed a defect, marked a false issue, or needs better training examples from a specific session.
Open Image Review
- Open a pallet QA data source.
- Click the Validation tab.
- Click the session you want to review.
- Click an image in that session.
The page opens with marks and inspection details on the left, the current image in the center, and the rest of the session on the right.
The left panel is one scrollable card of collapsible sections, all at the same level: Marks, a Pallet section, a section for each captured pallet side, and (when available) Auto Detect. Every section starts collapsed with a short summary in its header — expand the ones you need and scroll the panel when a section runs long.
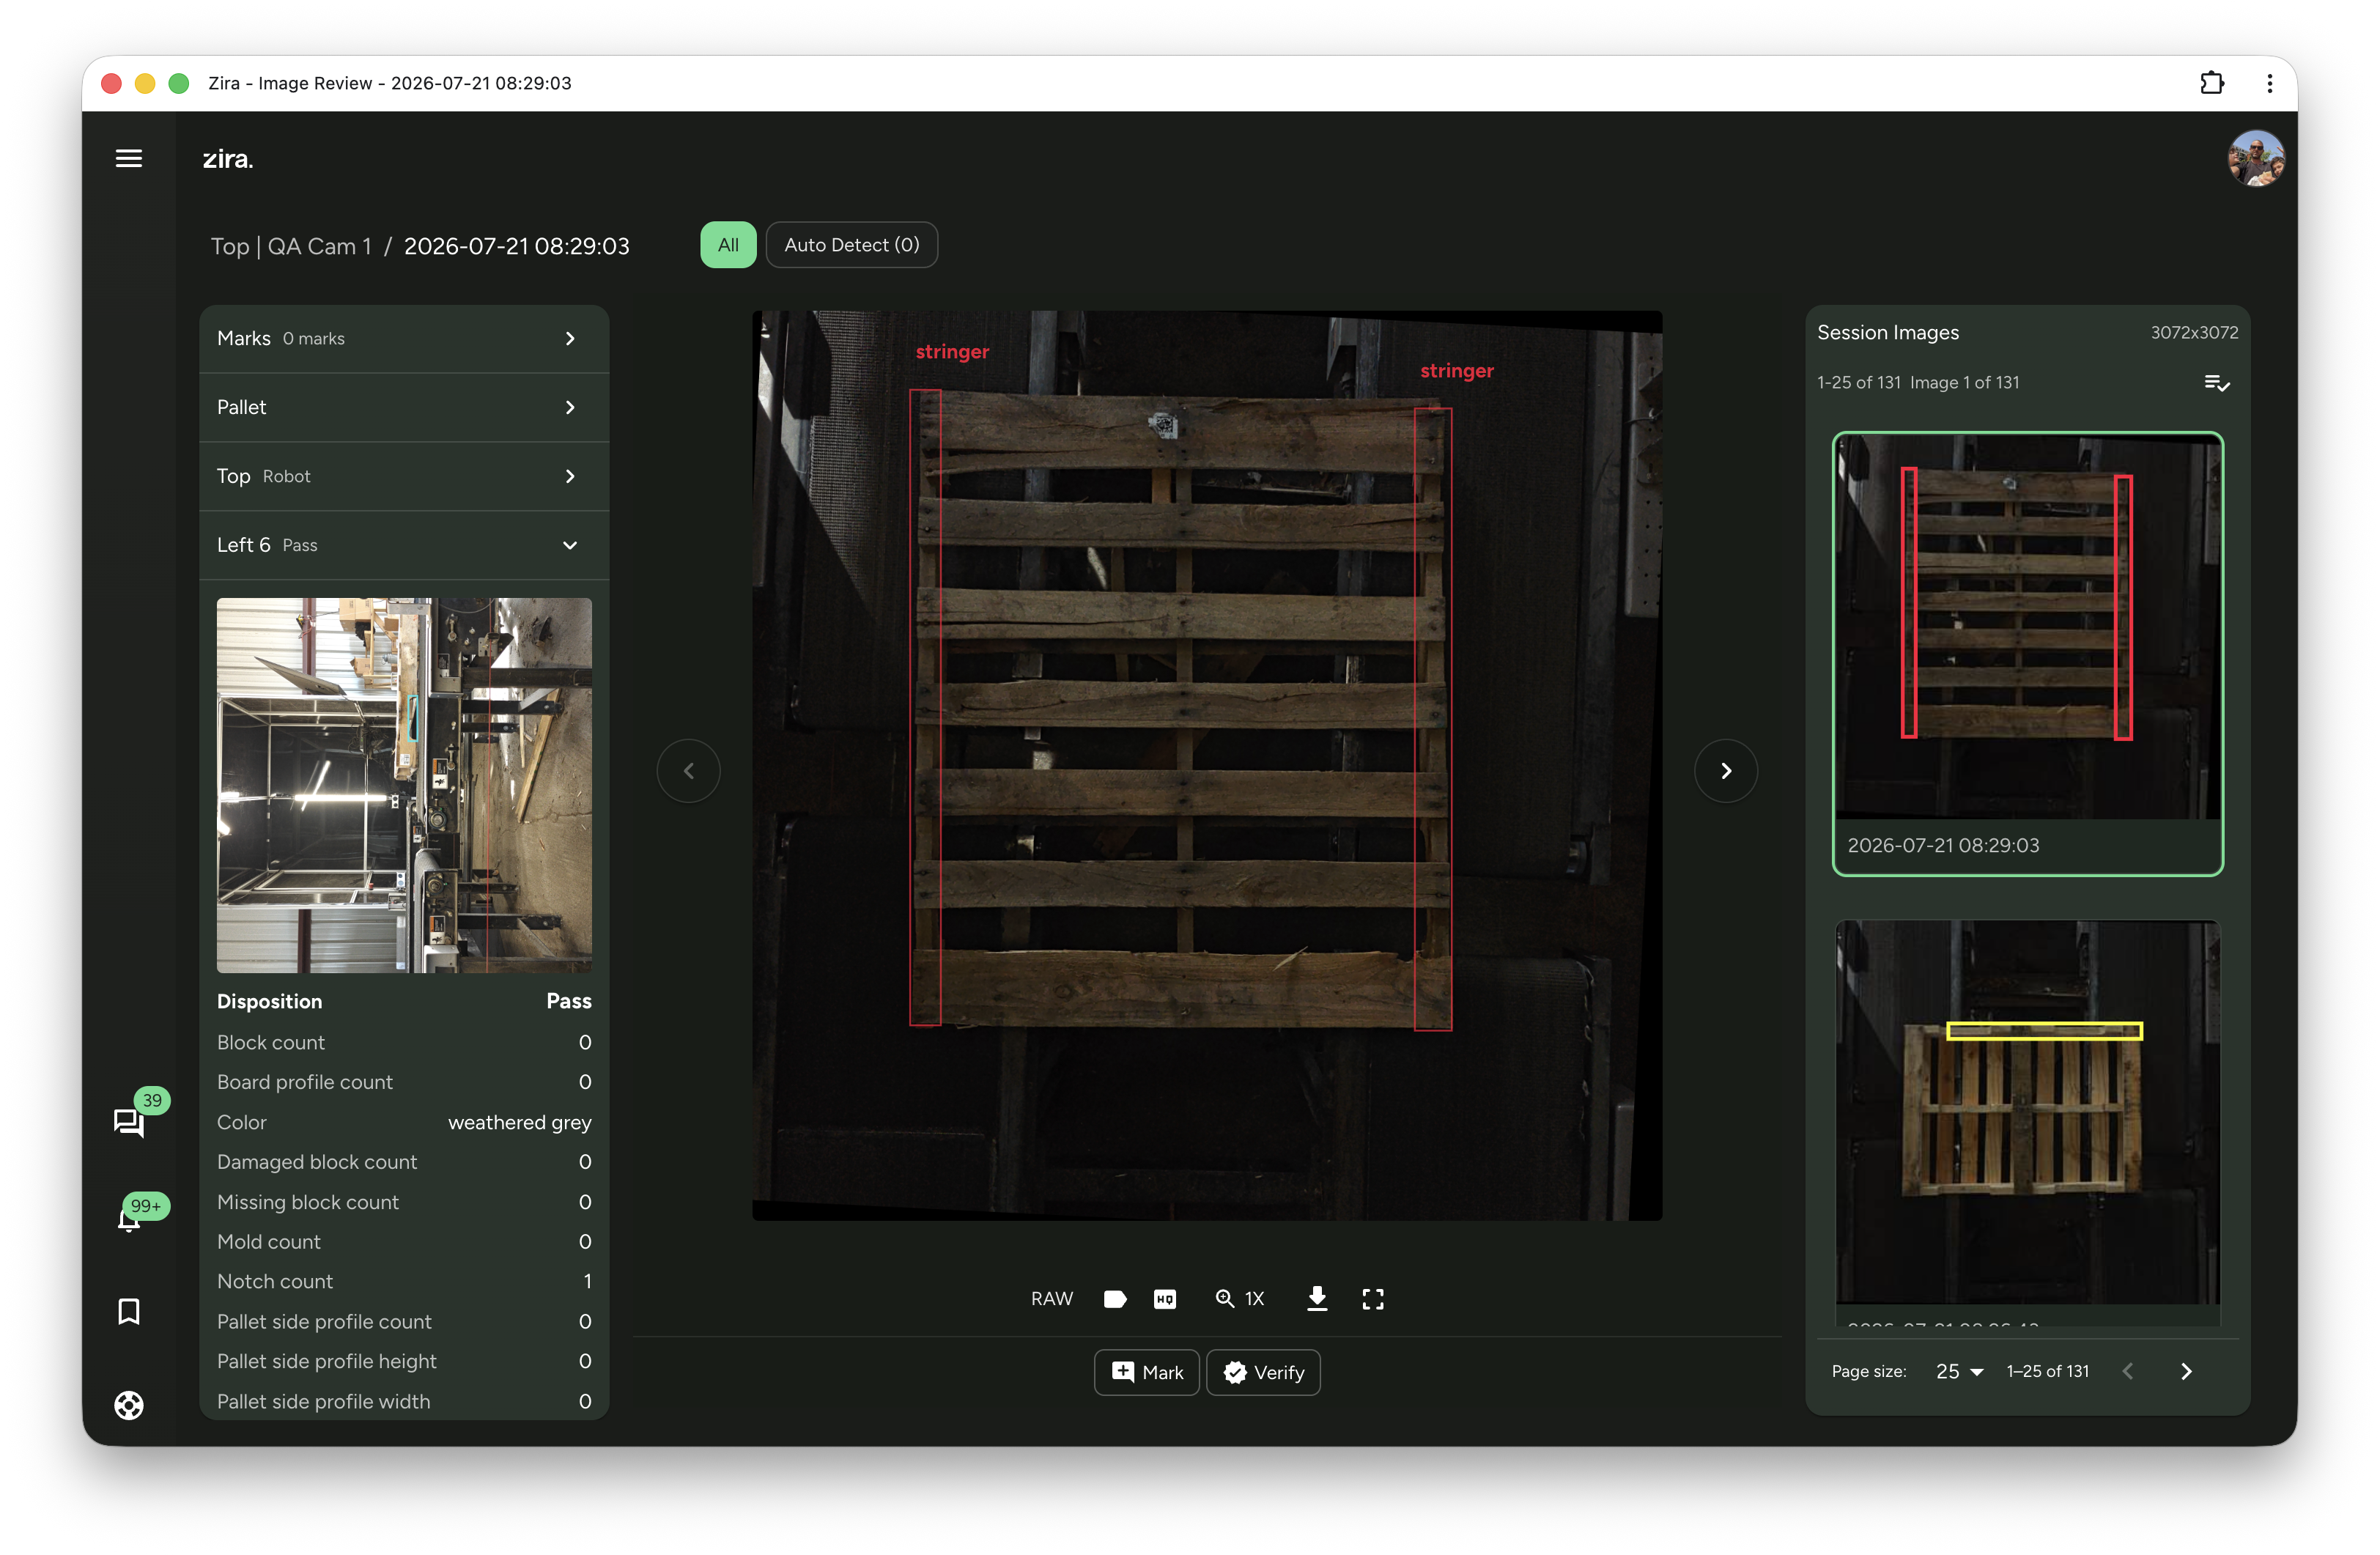
What each area does
Marks
Use the Marks panel to review saved feedback for the session.
- The count next to Marks shows how many marks exist in the current session.
- Click a mark to open the related image.
- Use the delete button on a mark when you want to remove a mark from the current image.
- Use the move button in the panel header when you want to move all marked images into a dataset.
- When a mark points at specific slices, their ids (for example
b2-s1) appear on their own line under the label, so you can tell a colleague exactly which crop you meant.
Copies
Use the Copies panel to see where the current image has already been sent. It is the last panel on the left, and it appears only for images that have been copied — no panel means this image has never gone into a dataset.
- Each entry shows whether the whole image or only slices were copied, the destination dataset and split, whether annotations went with it, and who copied it when.
- For a slice copy, the entry lists the slice ids that were sent.
- Images with a copy record are badged Copied in the Session Images list, so you can spot at a glance which frames of a session are already in dataset work.
Inspection (Pallet and side sections)
Use the inspection sections to compare the device result with the actual image.
A pallet can be captured by several synced devices at once — one for each side (for example top, left, and right). Each part is its own collapsible section in the left panel, with its disposition shown in the section header:
- Pallet — the pallet-level result the devices agreed on: disposition, lane, matched stage, catalog, model, rules matched, and color.
- One section per side — expand a side to see its snapshot image, with that side's detection boxes drawn on it, plus its full inspection payload. If a side has no snapshot, the section says so instead of showing a broken image.
Click any side's snapshot to open the full image. In that view you can see the detections with their label names, rotate the image in 90° steps when the camera captured that side at an angle (the boxes rotate with it), and open the original at full resolution.
Each side can show:
- disposition
- lane
- matched stage
- catalog
- model
- rules matched
- boards and stringers counts
- defect counts such as missing boards, broken boards, and cracks
- quality values such as coverage, squareness, dimension, and side
Main image viewer
Use the center viewer when you want to inspect the current snapshot closely.
- Prev and Next are floating buttons over the left and right edges of the image, so you can step through the session without moving away from the picture. At the end of a session, Next can continue to the next session.
- The center viewer always shows the image you opened, with its detection boxes and measurement overlay. To see the other captured sides of the same pallet, expand each side section in the left panel, where each side shows its own snapshot.
- Your zoom, pan, RAW/VAL toggle, and measurement overlay carry over as you move between images, so you don't have to re-set your view on every snapshot.
- The view controls stay together on a single row above the divider.
- Mark opens the review mark window for the current image.
- RAW hides the detection boxes and shows the plain image.
- VAL brings the detection boxes back so you can see the detected labels.
- The ruler button toggles the measurement overlay (the colored board/stringer segmentation masks and the green dimension lines that show overhang and board sizes). It appears only when measurement data exists for the image.
- Scroll the mouse wheel over the image to zoom in and out, centered on wherever your pointer is — the spot you are pointing at stays under the cursor as it grows. On a trackpad, pinch to zoom.
- Once you are zoomed in, move around the image by scrolling with two fingers on a trackpad, by dragging with the left button, or by pressing the mouse wheel like a button and dragging.
- Holding Cmd (or Ctrl) while scrolling always zooms, whichever device you are using.
- 1x shows the current zoom, and clicking it steps up through the zoom levels and back to 1x.
- The download button saves the current image.
- The fullscreen button opens a larger review view.
Filter the session
Filter chips sit above the viewer so you can narrow a long session to the images worth your time.
- Defect chips focus on images tagged with a specific defect type.
- Disposition chips filter by the device's verdict for the whole pallet — for example Pass, Defect - Severe, or whatever dispositions the session contains. Each chip shows how many images carry that result, so you can jump straight to every scrapped pallet in a session.
- Pallet mark filters by the mark the camera read off each pallet — useful when you want to look only at one product or batch. It appears only when the session actually contains marked pallets, and pallets the camera could not identify are left out of the list.
- Click a disposition chip again to clear it, or use All to clear every filter at once.
- Dispositions load in the background as the session is read, so those chips fill in shortly after the page opens and their counts climb as more of the session is scanned.
- If the image you're on gets filtered out, the page moves you to the first image that still matches.
Session Images
Use the Session Images panel to keep the rest of the session within reach while you work.
- The size label shows the image resolution for the session.
- The range label shows which images are currently visible in the list.
- The image counter shows where the current image sits in the filtered session.
- Click any thumbnail to open that image.
- Use the checkboxes when you want to select several images.
- Use the selection menu to select the current page, all filtered images, or a custom range.
- Use the copy button after selecting images when you want to send them to a dataset.
- Use the clear button to remove the current selection.
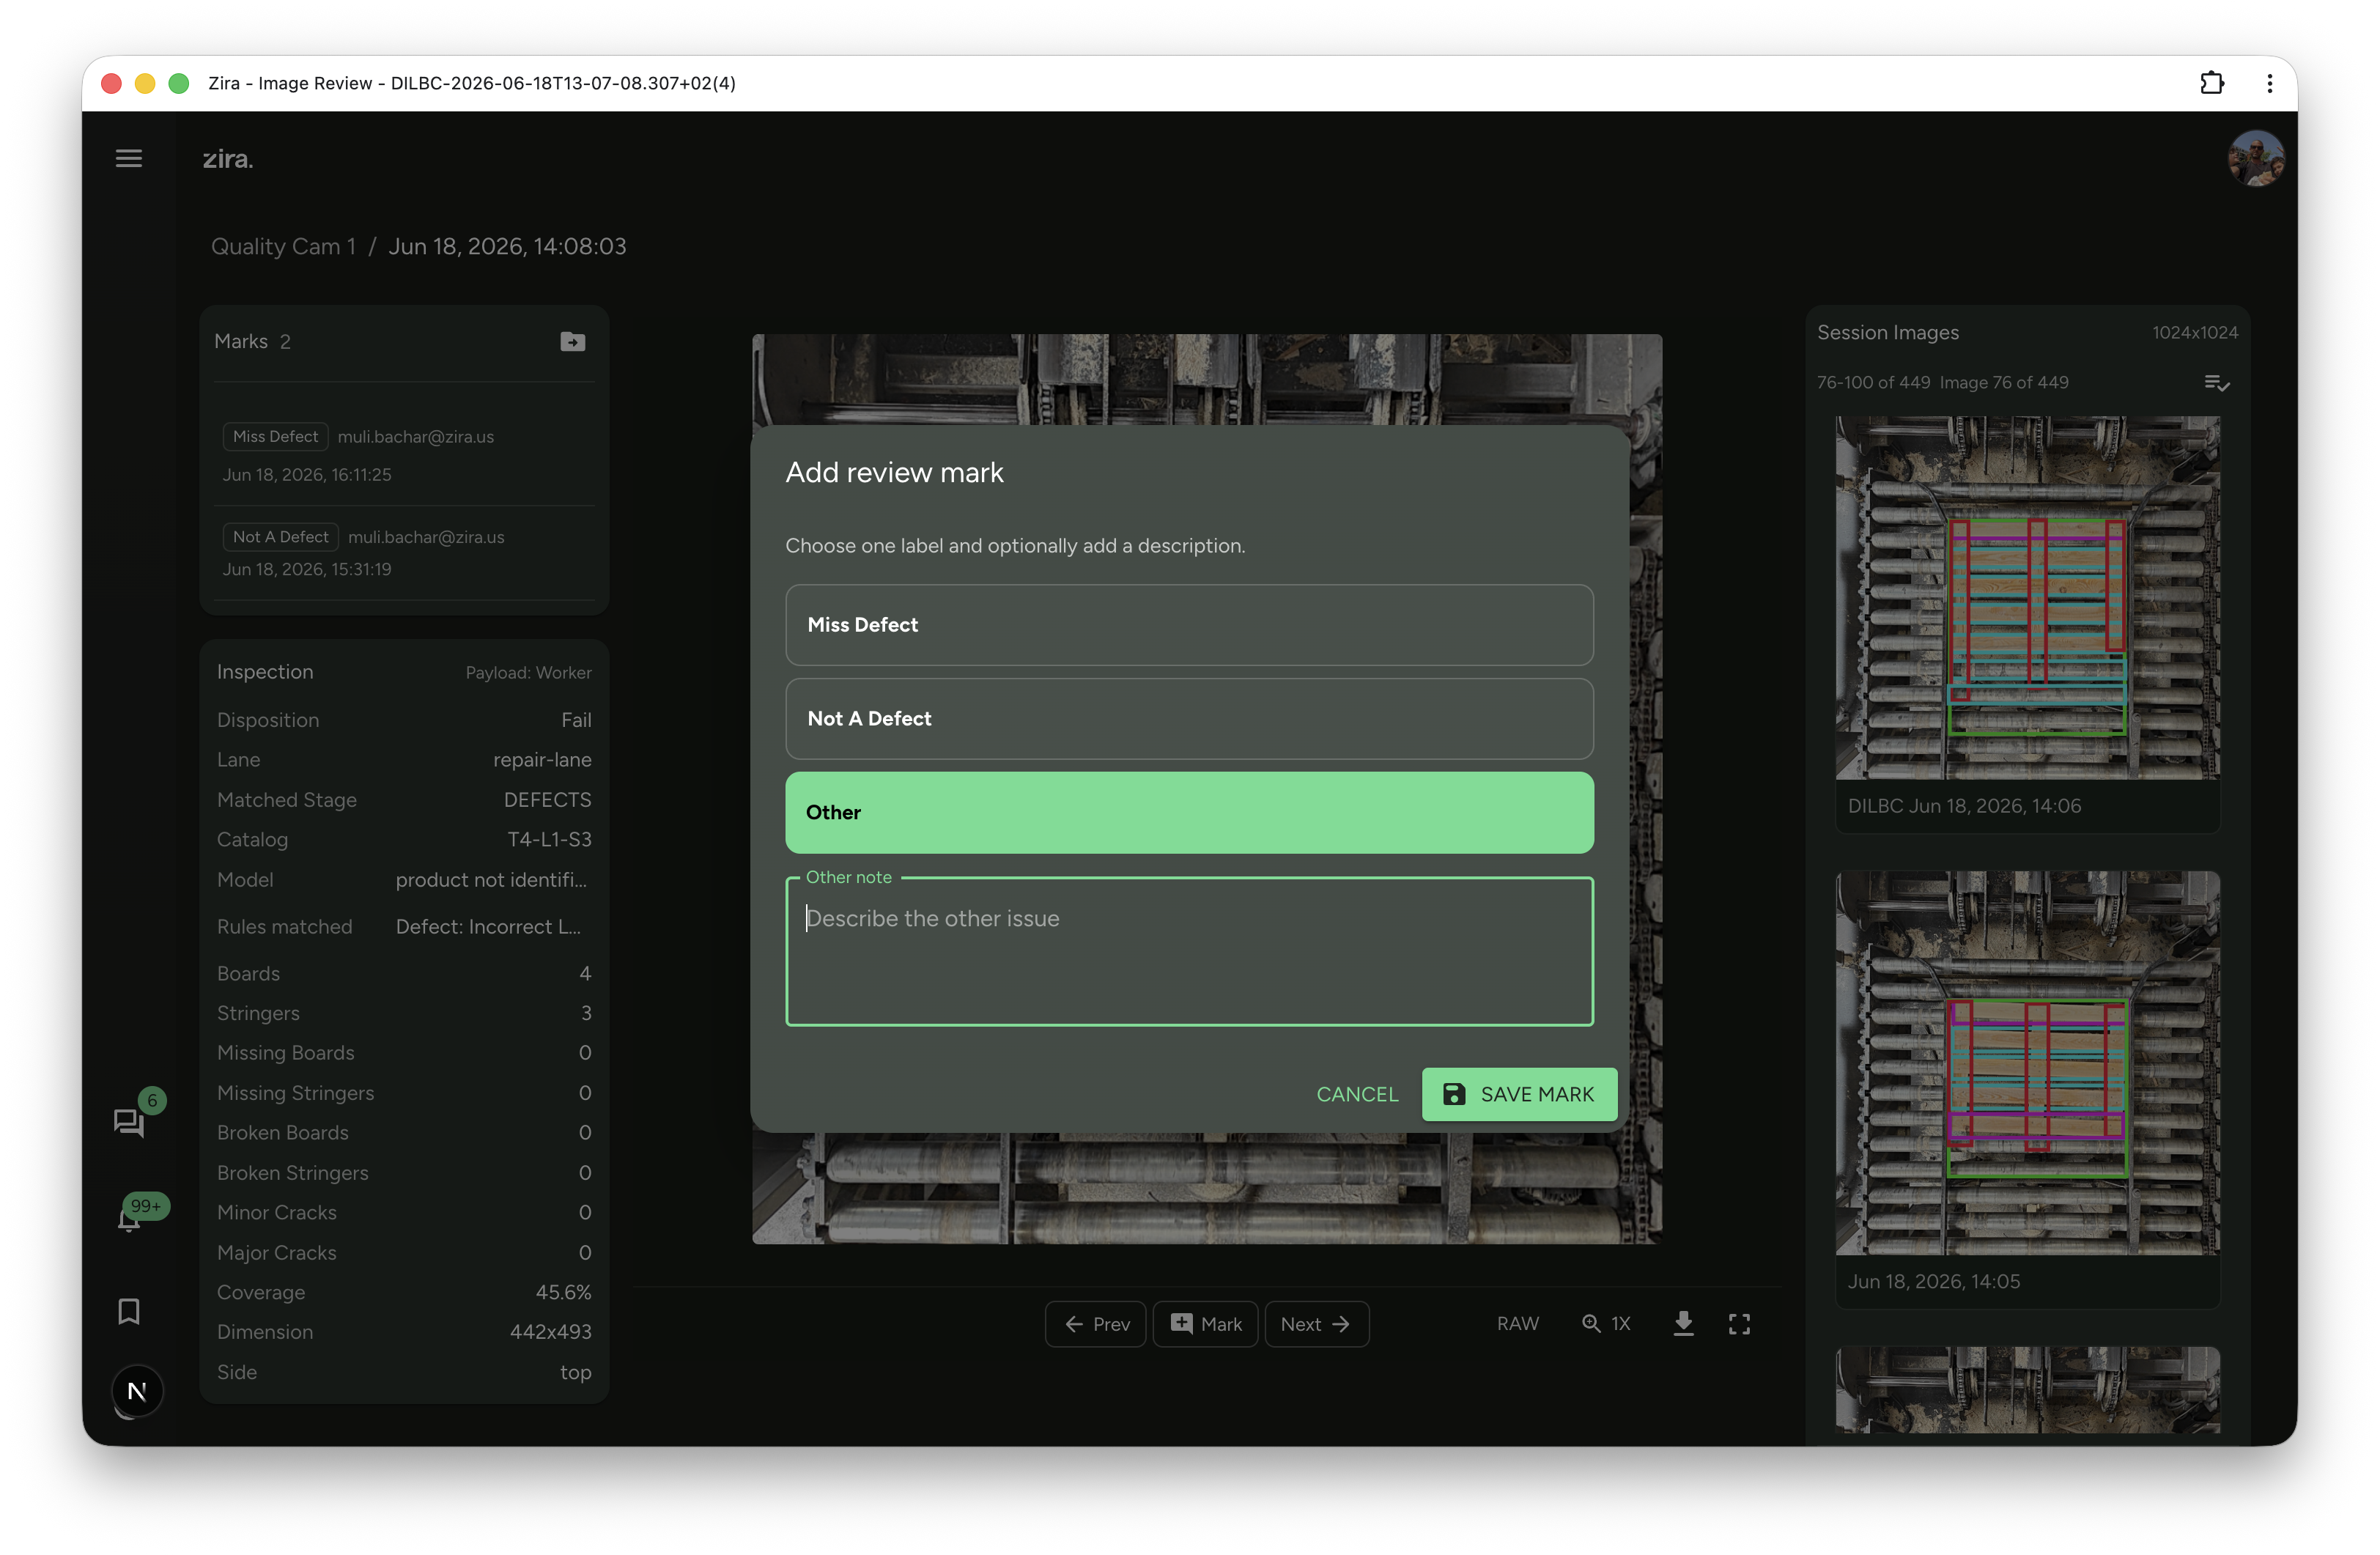
Add a review mark
- Click Mark.
- If you have slices selected on the image and the mark is about those crops, click Add selected slices. This records their ids on the mark — the crops themselves are not copied anywhere.
- Choose Miss Defect, Not A Defect, or Other.
- If you choose Other, add a short note.
- Click Save mark.
Saved marks appear in the Marks panel and stay attached to the session so the next reviewer can continue from the same point.
Move or copy images into dataset work
Use the dataset actions when you find images that should help improve the model.
- Use the move button in Marks when you want to move all marked images from the current session.
- Use the selection tools in Session Images when you want to copy only part of the session.
- Choose the target dataset and split in the dataset window before you confirm.
- The window reopens with your last dataset, split, and annotations choice already set, so copying image after image into the same place takes one click less each time.
- Every copy is recorded on the source image, and shows up in its Copies panel and as a Copied badge in the session list.
- If an image or slice already went to that same dataset and split, you get a warning naming what is already there, because copying again replaces it. Choose Copy anyway when replacing is what you want — for example after a better model run — or cancel and pick another dataset or split without losing your settings.
Tips
- Start with the Inspection card before adding a mark so you can compare the image with the device decision.
- Keep the overlay on while checking detections, then switch to RAW when you need to inspect the image without labels.
- Use range selection when a long session contains a continuous block of useful examples.
- Move or copy only the strongest examples so your follow-up dataset stays focused and useful.
Read next
- Validation - Return to the Validation tab overview and the session list workflow.
- Video Review - Review validation clips when the issue is easier to confirm in motion.
- AI-Pallet QA and Routing - Learn how pallet QA fits into the larger workflow.
- Datasets - Continue with dataset preparation and organization.