
Act on What the Camera Sees
Routing rules can now switch an andon light or drive a machine PLC, a trim saw calibrates itself while you watch from your desk, models push to a named slot and prove they landed, and training explains every setting in plain language. You can also connect a site to Claude and ask about your operation out loud, and open the AI Assistant from any page without making it your home page.
Until now, a camera that spotted a problem could tell you about it. In this release it can also do something about it — a routing rule can switch an andon light or trip a PLC contact the moment it matches. Alongside that: a trim saw calibrates itself while you watch, models push to a named slot and tell you they got there, and teaching a camera something new no longer asks you to fill in a form full of machine-learning vocabulary.
Ask Claude about your plant
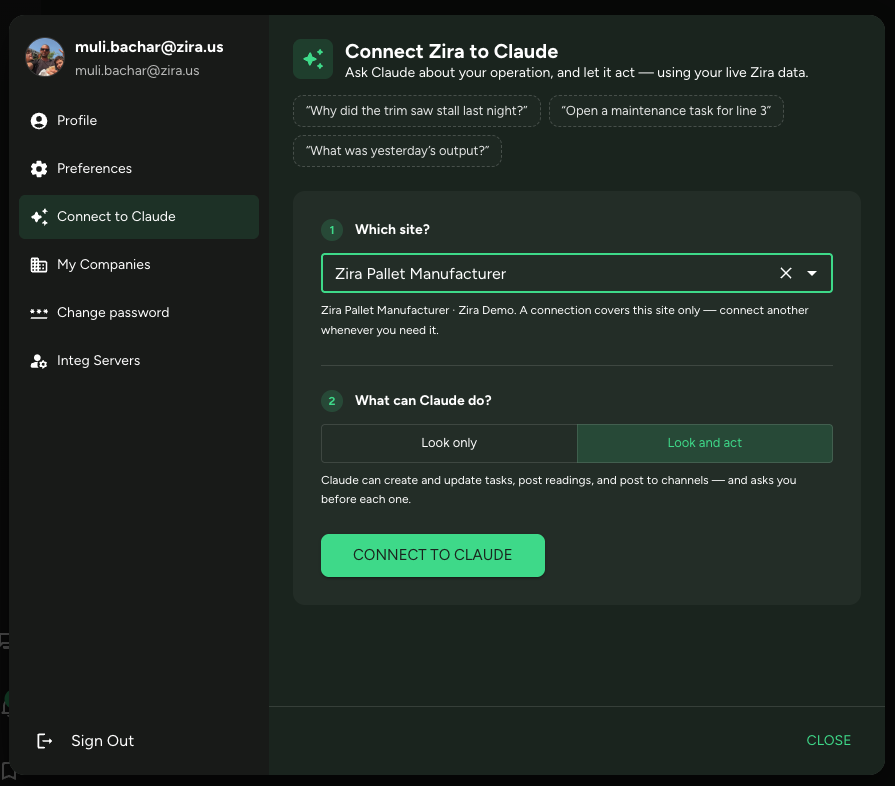
In beta. You can now connect a site to Claude and ask about your operation the way you would ask a supervisor:
- "Why did the trim saw stall last night? Check its readings around 22:00."
- "What was yesterday's output on line 3?"
- "Show me the open tasks for the Rehovot plant."
Claude finds the right data source by name and looks the readings up in your live Zira data. No more copying readings into a chat window or pasting answers back out.
Open your profile picture and choose Connect to Claude, pick the site, choose what Claude may do, and paste one line into Claude. That is the whole setup.
Choose Look only and Claude can answer questions but change nothing. Choose Look and act and it can open and update tasks, record readings and post to a channel — asking you before each one.
We are still refining this one, and we would like to hear how it goes.
Read more: Connect Zira to Claude · the full release note
The AI Assistant, from any page
Until now, the AI Assistant came with a trade: to use it, it had to become your home page. Plenty of people would rather start the day in the feed or on a dashboard — so the assistant now has a door of its own.
- Look for the AI Assistant icon — the sparkles — in the left menu, just above Chats. It opens the same assistant, with the same answers, previews and builders, and your Work mode stays exactly as it is.
- Your saved chats come with you. A conversation started from the icon is under Saved chats wherever you open the assistant.
- On a phone, open the menu and tap the same icon.
- Heading back is one click: open the menu and click the Zira logo to return to your home page.
If the AI Assistant is already your Work mode, nothing changes — it is still the first thing you see, so the icon stays out of your way.
Read more: Home AI Assistant · Choose Your Work Mode
Let a rule switch something on the floor
Routing decides which lane a pallet goes down. Now a rule can also do something the moment it matches — so a decision on the screen becomes an action on the floor.
Actuators drive the camera's relay outputs. A relay is a dry contact, so anything that takes a contact closure can be driven from a rule:
- Andon lights — put the red lamp on when a severe defect is routed, and clear it when the line recovers.
- A machine PLC — stop or start the line, or fire an eject, by closing the contact the PLC is already watching.
- Horns, diverters, gates — anything on a relay.
Pick the actuator and relay, then choose on, off, or pulse. A pulse takes a duration, which is what an eject or a momentary stop signal wants. Actuators that publish named functions of their own offer those too, with whatever fields the function asks for.
Only actuators the camera currently reports as online can be chosen. If a rule points at one that has gone away, it stays on the rule as a warning rather than being quietly reassigned — so you find out before it drives the wrong thing.
Webhooks are the other half: send an HTTP request when a rule matches, to tell an MES, a scheduler, or anything else that should know. A rule can call several.
Rules in the Default stage can now be set to always match, so pallets nothing else caught can still trigger an action — not just fall through to a lane.
And you can tell whether the camera took it
Saving routing sends it to the camera, but a save is not proof it was applied. The toolbar now shows Awaiting sync, Syncing, or Up to date per camera, with its name when more than one is paired. Cameras that were offline pick the change up when they reconnect.
Calibrate a trim saw from your desk
Measuring what a trim saw actually cuts — the length of a board going in and the length coming out — used to mean commissioning the camera at the machine. It is now a run you start from the console and watch on the live view.
Open Trim saw stops beside the live view, press Collect, and let the saw run. The camera watches boards go past and captures a line for each stop it finds. Stop when you have enough, tell it which cut size each line is, and apply. That is the calibration.
- You only declare the sizes. The positions are the camera's own measurement, so there is nothing to tape-measure and nothing to type in from the floor. Declare the sizes up front if you know them, or label each line after collecting if you would rather see what turns up.
- A camera set up against a measured reference needs only one cut size instead of two. When that applies, the window says so and shows the reference it was given.
- Add to a calibration, or start over — and it asks which. A saw that has drifted can be re-measured while keeping its existing sizes. Clearing them is now a single confirmation naming how many stops will go, rather than a question buried under settings for the run afterwards.
- A run that nobody finished shows up on the data source, so a collection left open does not quietly block the next one.
- Stops are set up by the side of the board they sit on — left, right, top or bottom — rather than by which end of the travel they are nearer.
This needs the current camera app on the device.
Send a model to a camera, and know it landed
Cameras can now hold several models at once, so pushing one asks which slot it goes into. The slot list comes from the camera itself, so a camera with four of them needs nothing configured here.
Knowing what a camera is actually running used to be guesswork. The Models tab now lists each model the camera reports, matched against what is stored in Zira, and says how confident that match is — an exact fingerprint match, or only a likely one based on name and size. Where it is unsure, you can ask it to verify, and it checks the file byte for byte.
Adding a model is easier too: .pt files upload directly, and a new dialog collects the type,
classes and where it came from at the point you add it.
Training that explains itself
There is a new Training guide in the help centre, covering the whole path from a labelled dataset to a model running on a camera.
The training form is now called Train a model, and it opens by telling you what a run does: it learns from a dataset, it runs in the cloud, you can close the page, and it takes minutes to hours.
- Settings are grouped into what you are making and how it trains, so it is obvious which handful of fields matter.
- Every field has a plain-language explanation beneath it — "How many times it reads every image. 100 is a good start."
- The expert controls have not gone anywhere; they are collected under Advanced, clearly marked as things a normal run never needs.
- Only one field is required: the name.
Fewer ways to waste a run
Cameras need a converted copy of a trained model, and some of the newer conversion formats cannot run on the camera app yet. If you pick one, the form now says so clearly before you start — instead of leaving you to discover it when the file will not go to the device.
Understand how a run went
- Finished runs score each class separately on how often the model was right when it fired and how much of the real thing it found — so instead of one overall number you can see exactly which defect still needs more examples.
- You no longer have to wait for the end. The run's charts now plot every class as it trains, so you can watch one defect catch up — or fall behind — while there is still time to do something about it. Switch between the two scoring styles to tell "found it at all" from "placed it accurately".
- The run also lists the image variations it generated from your pictures, so you can see what the model was trained against. If you need different ones, you can now set them yourself under Advanced.
- If the run trained on a merged dataset, the job shows which datasets went into it and how they were split.
- The Training tab says what it is for, and when it is empty it tells you how to start your first run rather than showing a bare table.
Group your datasets
Once a camera has been running for a while, its dataset list gets long. Now you can put datasets into groups — by product line, by camera, by whatever suits you.
- Add a group from a dataset's menu, under Groups. A dataset can be in several.
- The list opens in sections. A data source with groups is organised, and opening on the unorganised version hid that. The plain list is still one click away on the group icon.
- Rename a group from its heading and every dataset in it follows. Rename it onto a group that already exists and the two merge — you are told before you confirm.
- Datasets that are not in any group collect under Ungrouped, after the real groups.
- Anything you put in archived drops to the bottom and stays closed, so finished work is out of the way without being deleted.
Dataset tags have been retired. They did the same job as groups without any of the behaviour, so a dataset could end up labelled twice and sorted once — groups now do it in one place.
The Datasets table was tidied up while we were there: the toolbar is one consistent set of controls instead of five different-looking ones, notes show their text in the list rather than an icon, and the versions count is a link you can click.
Merging datasets, without the wizard
Combining datasets used to be a three-step wizard ending on a page of counts, duplicate reports, per-dataset split cards and half a dozen checkboxes. It is now a single short form that asks the four things a merge actually varies: which datasets, what to call the result, how to split it, and which classes to keep. Everything else is simply handled.
The detail has not gone — it is in a Merge analysis section you can open when a merge looks wrong, showing per-dataset and per-class counts, repeated images and box quality.
Choosing which classes to keep also works properly now: the list reorders as you press the arrows, and the number beside each class is the class number the model will learn.
Follow work that outlives the page
Merges, training runs and camera-file builds take minutes and keep running after you close the window that started them — or close Zira altogether. Background work, the history icon above the Datasets table, is where you follow them.
It carries a badge with the count, turns into a spinner while something is still going, and opens a list of what each piece of work is doing and how it ended. The snackbars that start these jobs now point you straight at it.
Models that say what they are
- The tab now has two clearly named lists — what the selected camera reports it is Running on this camera, and everything Stored for this data source. It used to be one word above both.
- Every model can carry a type — what it looks for — which the Models tab groups and filters by. You can set it while training, or correct it afterwards from the model's menu.
- Version and Format are their own columns instead of chips crowded into the name, so long model names stop wrapping onto two lines.
- Opening a training run keeps your place. It now opens in a panel over the list rather than navigating the whole page away from the models you were reading.
- The row menu says what each action is for in plain terms: Build a file for the camera, Fine-tune from this model, Change what it looks for.
- Models built in a format the camera app cannot run yet are marked, so you find out in the list rather than at the moment you try to send one.
Quality you can watch live
- QA snapshot widgets update the moment an image arrives instead of polling on a timer, so a dashboard on the wall keeps pace with the line.
- A marks report gathers what reviewers marked across a site, so you can see what is being found without opening each session.
- Auto-defects flag known defect patterns as they come in.
- A Validation hub brings session review together in one tab, and the site list now shows at a glance which data sources are stable and current.
- Snapshot widgets take dashboard date filters, so one dashboard can be pointed at any shift.
Judge a snapshot without leaving the dashboard
Opening a snapshot from a QA Snapshots widget used to load the whole review page inside the dashboard. It now opens a reviewer built for the job:
- A magnifier shows the frame at the camera's own resolution — which is what makes a nail head or a hairline crack readable at all. On a pallet camera the reviewer can also draw the board and stringer crossings and let you pick the ones a defect is in, and the mark records exactly which crops you meant, so the next person looks at the same ones.
- Your filter comes with you. The arrows step through the snapshots the widget is already showing, so a defect filter carries into the reviewer and keeps going past the end of a capture session.
- Marks already on the image are shown, so a frame does not get judged twice.
- Back returns to the dashboard instead of leaving it, with every other widget still as you left it.
- Or mark without opening anything. Put the review categories on the card with Show mark buttons, and on a single-image widget you can draw the crossings there too — tap the ones a defect is in, press a category, done. Five steps become two. Opening the snapshot is still the better call when the judgement is close, because there the image is full resolution.
- On a tablet, pinch to zoom — the magnifier starts off there, since a panel that size costs more screen than it gives back. Tap a crossing to select it, and if you do turn the magnifier on, press and hold to move it.
Dashboards and agents
- Correction fields for Data Research widgets. Apply a calculation to every reading before it is grouped, then group, measure or filter by the result — the one place a correction can change what a chart's categories actually say.
- Alerts that get out of the way. A popup condition alert can now fade itself out after a set delay instead of covering the widget until the next reading arrives.
- AI agents can work across several dashboards at once, take a time range, and be told what answer style you want.
- Charts default to sensible sizes and font scales, gauges to a sensible colour, and a data table can be printed.
More ways to get images in
- Take a photo straight from your phone when filling a form or adding images, with the camera opening reliably on mobile.
- Copy into a dataset keeps your choices — split and annotation settings persist between copies.
- Shuffle & split gained real options and a preview of the result before you commit, and both copies and merges now honour a target resolution.
- Dataset images show tiny box and edge box chips so weak annotations are easy to spot, and label visibility, class colours and thumbnails stay in step.
On the cameras themselves
Plenty changed on the cameras too. There are no new screens to learn — it is mostly things being more accurate, and less being lost.
Sharper pictures, steadier counting. Exposure, ISO and zoom can be set by hand, the preview can be rotated and stays that way, and a camera can now sample at high resolution without slowing down the detection it is running at the same time. A frame-rate default that had been quietly holding cameras at 15 frames a second is fixed. Occupancy areas can be any shape rather than a rectangle, counting triggers can be limited to a single label, and pallet cameras are better at nails, lead boards and keeping detections inside the pallet — with calibration that stays correct when the camera is mounted at an angle. Stations running several cameras together coordinate more reliably.
Less gets lost. Shift counts now survive restarts, recoveries and shift changes instead of being dropped, and a reading the server rejects is held rather than discarded. Recordings keep their raw and validation clips together, pick up stalled uploads again, and recover from encoding errors rather than ending up half sent. Cameras also show their CPU and battery temperature, so a unit working too hard is visible before it starts dropping frames.
Around the rest of the app
- Image review — a new Pallet mark filter narrows a session to one product or batch. It shows up only when the session actually contains marked pallets.
- Pie charts can now show a legend, for when the slice labels are too tight to read.
- Indicator widgets read True or False on a yes/no field instead of a raw value.
- Chart tooltips hold still, so the view entries button stops sliding away as you reach for it — and sorted Data Research charts now draw their axis correctly, embedded ones included.
- The tasks board scrolls to the bottom, loads more reliably, and opens the card you clicked.
- Schedules can be added at site level, and straight from an AI widget.
- The app remembers more between visits, so returning to a page you were just on is quicker.
Read more
- Connect Zira to Claude — new guide
- Home AI Assistant — opening it from the left menu
- Routing — actuators, webhooks and device sync
- Trim Saw Stops — calibrating a trim saw
- Models — rewritten
- Training — new guide
- Datasets — groups, merging and background work
- QA Snapshots — live updates, marks and reviewing from the dashboard
- Image Review — pallet mark filter